The Clarinet - Finger-work and Dexterity

Welcome to this fifth blog considering the content of my new book, The Clarinet. The aim of the book is to present a really thorough discussion of all aspects of clarinet playing, to explain what really happens as we play (much of that scientifically) and how we can learn to develop real control of this wonderful instrument.


In this article we’ll be looking at Finger-work and Dexterity (Chapter 8), an area that so often forms the largest segment of a developing player’s aspiration. “How fast can I move my fingers?” can become the all-consuming aspect of what we label ‘technique’ and although it is indeed central, it is important to remember that it sits, equally, alongside tone production and articulation in the development of a holistic all-round technique.


Of course, we all desire fluent, fast, economical, precise and well-coordinated finger movement – which will allow us to play all that wonderful repertoire. But the development of a really good finger technique will also have a greater and often overlooked impact. The very movement and velocity of our fingers has a significant effect on the actual sound we make too!


So, this chapter looks closely at how we develop our finger work – specifically how we can make our fingers do whatever is required. Maybe the first important point to consider is what actually drives our finger movement? And it might surprise you to learn that it’s not the muscles in the fingers –that’s because there aren’t any muscles in our fingers! The muscles are elsewhere, but that is not important. It’s the brain that drives our fingers. The rhythmic impulse, created in our brains, sending the instruction to the finger to move now is the overriding driver.


As a consequence, it’s essential to feel a strong sense of pulse when working at exercises and studies and connect each physical movement to a brain-generated rhythmic impulse. And there certainly are a lot of exercises to explore! They look at all connected areas like finger location, finger pressure, finger strengthening, control of key-work, and developing fast playing and agility. In the first instance, trill practice is a great way to get fingers moving: practice a trill using each finger at each practice session – especially important to work at little-finger trills. Play them for as long as you can working at evenness and duration. Only very gradually speed them up. Never play a trill faster than you can control well.


Scale practice is also very important and there are many scale exercises to try alongside lots of advice. Enjoy these! Get scales into the positive side of your mind. They really are useful and fun to work at!


There are also some specially written exercises to enable a quick warm-up before a concert or exam.


As you work to speed up your finger-work, remember this very important thought: Fast music is often not about fast fingers but rather about the (short) gap between each finger movement. The ideal manner in which to prepare ‘fast’ music is to practise slowly, ‘programming’ each movement carefully into your memory. Chose the passage you wish to work on, then work at each interval meticulously, thinking about:

1. Which fingers move

2. How they move

3. Any coordination issues

4. Use of oral cavity (voicing) and/or embouchure.


Here’s an exercise to apply to your trill practice:

During practice, make the trilling finger move with a consistent distance from the instrument, rhythmic evenness and make sure no tension builds in the hand, forearm or indeed anywhere else.


In time, and with patience and care (and regular practice!) you should be able to develop the facility to play anything you want.


To learn more, buy a copy of The Clarinet here: https://www.fabermusic.com/shop/paul-harris-the-clarinet-p439043
The Clarinet - Articulation

Welcome to this fourth blog considering the content of my new book, The Clarinet. The aim of the book is to present a really thorough discussion of all aspects of clarinet playing, to explain what really happens as we play (much of that scientifically) and how we can learn to develop real control of this wonderful instrument.

In this article we’ll be looking at articulation which often causes players, at many levels, quite a bit of anxiety – but it shouldn’t! Articulation is all about how we begin, end and separate notes. It also concerns the duration, weight and character given to a note and, ultimately, we need to learn to articulate with as much fluency and speed as possible.

Let’s deviate for a moment …


What are the three fundamental requirements in the act of slicing a cucumber?

·  A cucumber

·  Holding the cucumber steady

·  An implement with which to slice it


Of the three, which is the most important? Clearly, it’s the cucumber. You can’t slice a cucumber if you don’t have a cucumber! The analogy with articulation is a good one.

·  The cucumber is the air column which is the sound.

·  Holding the cucumber steady is the embouchure.

·  The implement that slices the cucumber (or here, the air column) into slices (notes) is the tongue.


Of the three, which is the most important? It’s the air column: the sound. Without the sound there would be nothing to articulate. The embouchure and tongue are essential, but secondary to the air.


This is such a useful metaphor and if we remember to maintain a good air supply, articulation (or tonging as many call it, though this label does tend to place too much emphasis on the tongue) becomes very doable. We can try many exercises to develop accurate and clean articulation that will develop and eventually lead to the control of notes of all lengths and at any speed. They also reinforce the idea that a note is released rather than ‘begun’.


The different areas to explore include:

o   Starting and ending notes and tongue pressure

o   Controlling the duration of a note – staccato

o   Articulation differences across the registers

o   The weight and character given to a note at its initiation

o   Developing speed and fluency


One of my heroes, Karl Leister, is a great proponent of no-tongue or breath articulation. For a beautiful and imperceptible start to a note – such as you may wish for the beginning of the Weber Concertino or the second of Brahms’ two Sonatas – this  is a very useful technique to develop and should be considered thoroughly. Of equal importance are ideas on developing continuous articulation and speed of tonging.


In practising this technique, try to feel that each note is released. Remember that starting an articulated note is not about doing something to the reed with the tongue but using the tongue to release the reed and air column and thus create the note.

• Feel that the tip of your tongue travels in small upwards and downwards movements (not forwards and backwards).

• Feel the independence of the front of the tongue (doing the work) and the back.

• The movements should be rapid, relaxed and light.

• Take care to avoid accenting notes and keep the tone even throughout.

• Remember that when you are articulating continuously, the length of a note is controlled by the return of the tongue to the reed.

• Ensure no biting or squeezing of the embouchure.

• Always maintain a steady supply of airflow, as though you are playing a long note. This is the basis of effective continuous articulation.


The chapter also considers all the various articulation symbols, many of them also from a historical and cultural standpoint. For example, the staccatissimo mark has changed considerably through the years, and there are examples from the repertoire as well as studies to develop this understanding. Various forms of accentuation are also considered from many different angles. In German Romantic music for example, the accent mark indicates a more espressivo approach to a note rather than a harder or significantly louder sound.


In conclusion, remember the cucumber and take a very pragmatic approach to articulation, knowing that accuracy and speed are very attainable.


To learn more, buy a copy of The Clarinet here: https://www.fabermusic.com/shop/paul-harris-the-clarinet-p439043

The Clarinet - Intonation


Welcome to this third blog considering the content of my new book, The Clarinet. The aim of the book is to present a really thorough discussion of all aspects of clarinet playing, to explain what really happens as we play (much of that scientifically) and how we can learn to develop real control of this wonderful instrument.

In this article we shall consider the chapter entitled ’Intonation and playing in tune’. So first of all … can we improve our basic sense of intonation? Many may lack a certain confidence over their sensitivity to hearing precise intonation. The answer is we can (try my strategy involving a simple electronic tuning device and a daily exercise!) 

And once we do feel confident in hearing and judging intonation, there is much we can do both in the matters of playing in tune and manipulating intonation in very particular and effective ways. It’s important to remember that, unlike the piano, but like (maybe surprisingly) a string instrument, we (the player) have much responsibility over our intonation– as does the ambient temperature and what other instruments we happen to be playing with!


When playing with strings, or indeed in any ensemble that doesn’t include the piano (which of course is tuned to equal temperament), it’s possible to explore more natural tunings (known as ‘just’ or ‘pure’ intonation) that blend to make very pure and beautiful harmony. In the book I give a table that compares equal temperament (the fixed intonation found on a well-tuned piano for example) where all the semitones are (necessarily) tuned equally and pure intonation. Without going into too much detail here, if you start with a low note on the piano and then tune each ascending fifth exactly, by the time you get to the top and arrive back at the same note you began with, you’ll find those notes were not the same! So, some adjustments are made – this is equal temperament. But we can tune to a something closer to pure temperament. It’s a very small difference but the harmony produced can be very beautiful.  You’ll hear this in a choir who are trained to sing to pure intonation. A pure major third, for example, is 14 cents (14 parts in a 100) lower than an equal tempered one. A minor second is 29 cents lower – these are gradations of a tone that are audible. It’s a really fascinating aspect of playing.

We can also consider tuning in relation to the different registers: chalumeau, throat, clarion, altissimo, and how best to control these. Then through exercises and studies, we can begin to ‘practise’ intonation.


Here is a simple intonation challenge that will help build confidence in your ability to say whether a note is sharp or flat. You’ll need a piano or, preferably, a fellow clarinet player!


• Pull the barrel out by about 5mm (about 1/4 inch). This will make all notes sound flat. Play G2  (throat G) and compare it with the appropriate sounding note on the piano (in this case, the note F) or the same note from your fellow player (who shouldn’t change their barrel position). The increased length of the instrument will make you sound flat. Now push the barrel slightly further in and play G2 again. Compare. Keep pushing the barrel in until the tuning of G2 sounds correct. Do not use any resonant fingerings when you do this exercise.


• Using a short barrel pushed right in, play G2 again. It will be sharp, because the instrument length has decreased. This time gradually pull the barrel out and compare with the piano or your colleague until the tuning sounds correct.


To learn more, buy a copy of The Clarinet here: https://www.fabermusic.com/shop/paul-harris-the-clarinet-p439043

The Clarinet - Sounding Good

Welcome to this second blog considering the content of my new book, The Clarinet. The aim of the book is to present a really thorough discussion of all aspects of clarinet playing, to explain what really happens as we play (much of that scientifically) and how we can learn to develop real control of this wonderful instrument.

In this article we shall consider the fourth chapter which I’ve called Sounding good. Following on from the thorough warming-up regime in the previous chapter, Sounding good investigates the sound we make – maybe the most fundamental aspect of playing and performing. There is a detailed but (I hope!) understandable and practical discussion of the science of sound followed by a consideration of the three essential components involved in the production of sound: breathing, oral cavity and embouchure.


I have occasionally been a little provocative (in the sense of trying to clarify some slightly long misunderstood or misrepresented aspects of playing) and there are a couple of challenging ideas to explore. What does ‘support’ really mean, for example? We often hear teachers give the instruction to ‘support more’ but in fact they probably simply mean to produce more breath pressure. Support is the restraining of air and it increases more as we play more softly.  I have devised a new analogy based on the idea of the bow and arrow which I hope might offer a clear understanding of support and help players develop the processes more proficiently.

There is a very detailed study of what, in America, they call ‘voicing’ . The use of the oral cavity – or how we can use the shape of the inside of our mouth (via differing vowel shapes) – is a fascinating and often overlooked aspect of clarinet technique. Not only does it have a major part to play in the control of tone, legato, tuning and timbre, but it is also a crucial aspect of controlling the many colourful sonic effects the clarinet is capable of – glissando and pitch bending, multi-phonics and micro-tones for example.

Then we come to the dreaded squeak! Which is simply a high note – but usually not one we want. There are various reasons as to why squeaks suddenly intrude into our playing and many ways to help reduce their appearance that you can try.


Finally, here is a simple and instructive breath control exercise from the book:

Hold a sheet of paper vertically from above, fairly close to your mouth. Now, aiming at a central point on the piece of paper, blow out through pressed lips so that the paper rises. If your breath control, oral cavity and embouchure are well set up, you should be able to keep the paper at a constant angle for the entirety of the breath.

To learn more, buy a copy of The Clarinet here: https://www.fabermusic.com/shop/paul-harris-the-clarinet-p439043

The Clarinet - Be Prepared

I had been wanting to write an in-depth study on clarinet playing for some time – and with months of cancelled ‘live’ engagements, I finally had the time, thanks unexpectedly to Covid. Given that colleagues all over the world were in a similar condition, I found myself in the happy situation of being able to call the likes of Karl Leister, Phillipe Cuper and Stanley Drucker and find them, almost always, at the end of a phone, happy to chat and share thoughts about some fascinating aspect of clarinet playing. 


The aim of The Clarinet is to present a really thorough discussion of all aspects of clarinet playing, trying to explain what really happens as we play (much of that scientifically) and how we can learn to develop real control of this wonderful instrument.


In this, the first of a series of articles derived from the book, we shall be focusing on the content of the chapter entitled ‘Be Prepared’.


It’s amazing how a little preparation can add hugely to the success of whatever it is that we choose to do. In this case, it’s playing the clarinet, whether that’s to practise, rehearse or perform. Good preparation (and good posture) will enhance our playing to a significant degree. I’ve separated this preparation into a number of different segments, and whilst we don’t have to carry them all out, the efficacy of what we do subsequently will be all the more enhanced if we do. 


The segments are warming up and then limbering up without the clarinet; some consideration on brain states and posture, and then warming up with the clarinet.


Firstly, try doing something as a very general warm-up: take a short but brisk walk, for example. Limbering up requires attention to many parts of the body: shoulders, neck, jaw, arms, fingers, wrists, elbows, knees, spin and more. We can assign an exercise, or series of exercises, to each, as well as explore breathing in detail. The importance of developing a regime that includes doing as many of these exercises as possible lays in reducing tension and so setting you up for safer and more productive playing over any length of time.


You can also practise exercises to access the imagination and deeper states of brain consciousness which can affect how you feel and your control of memory and concentration.


When considering posture, the overall aim is to develop the ability to support the instrument with the least muscular tension as possible. Looking after the body and setting it up correctly will lead to the most tension-free and effective playing.


Now that we are ready to play, there are three main ‘pillars’ of technique to be explored in warming up with the clarinet: tone, articulation and finger work.


Spending quality time warming up really thoroughly will be of great benefit – and only by doing so will you really feel that benefit. Certainly, in the long term, it will keep you in very good condition!


Here’s an exercise to try that simultaneously warms up both body and mind:

­­­
Hold your arms up in the air with fingers pointing to the ceiling. Then raise each knee in turn and touch it with the opposite hand. Breathe in as you move down to touch the knee and then out, as the arm returns to the starting position.  Repeat the exercise reversing the breathing (i.e. breathe out as you move down etc.). Repeat either or both exercises for 20 to 30 seconds.


To find out more visit https://www.fabermusic.com/shop/paul-harris-the-clarinet-p439043

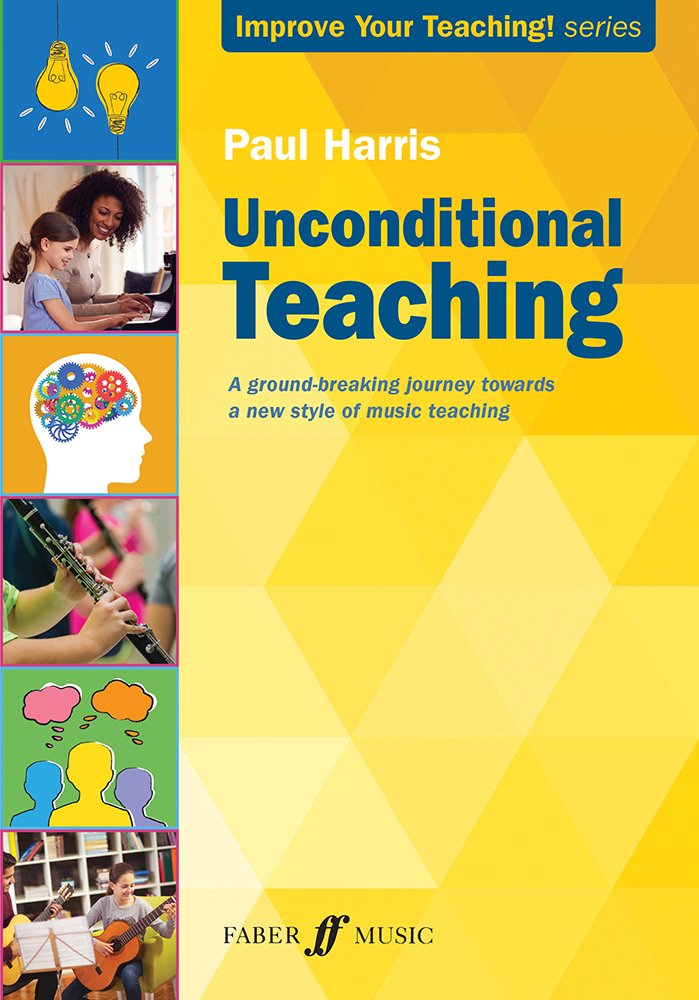
Unconditional Teaching

I was recently asked to deliver a presentation to the staff of a music academy on what I might best describe as the way in which teachers actually interact with their students.  


The senior management team were worried that the style of teaching, especially in these difficult times, was upsetting some students – even putting them off.

In the theatre there is that very special indefinable ‘place’ between the audience and the actors where something magical happens. It happens in a lesson too – the energy created when student and teacher are truly working in harmony. We might identify it as the two-way flow that is generated where real learning is taking place. 

So, they asked me to talk about developing an approach where all students could learn at their optimum level. To develop this kind of teaching we need to move towards a more unconditional approach – an approach where our own requirements (or conditions) take a back seat should we become to realise that they might actually be blocking the flow of effective teaching and learning. 


The whole idea of Unconditional Teaching has been floating around in my mind for quite a while, but the restrictions and strange circumstances that we have found ourselves in - as a result of Covid - focussed my mind and I decided to have a go at presenting the concept in book form.


My short book simply poses (and tries to answer) the following question: what are the conditions (or requirements), that we all have – whether knowingly or not! and how, if they are counter-productive, can we manage or even eliminate them? Before reading on, spend a moment to consider your own conditions. You’ll certainly have some and this may be the first time you have ever given this question any thought! Here is an example – I prefer it when my student arrives at their lesson having practiced.


How did you get on? How long is your list? In the book I list a surprising number! Some are entirely appropriate: I’ll teach on the condition my teaching room is safe, or that my clarinet student has an instrument that works. But many others are more provocative and questionable: I’ll teach on condition that my student rises to my high expectations; that my student is interested; that my student practises for half an hour a day; that my student is musical; that my student has a desire to build their technique; that my student will one day play a Beethoven sonata; that my student is actually learning everything I am teaching them…  A very important question then arises: can such conditions (and many more, some of which may be hidden deep in our subconsciousness and probably never even considered) ultimately block the flow of effective teaching and learning? If our students don’t satisfy our conditions, what effect might they have on our approach to that student?


Once we have acknowledged that there may be quite a number of these conditions swimming around in our minds, we are in a position to begin to deal with them. And this is what the book sets out to do. Each is considered alongside the ways to manage, or indeed eliminate the condition. 


At the heart of managing our conditions is the understanding that all students are different – and probably more different than we might care to think.  In their brain-processing speeds, in their adaptability to technical demands… in the way they do almost everything.


Thus, acknowledging our conditions and being aware of how they may be affecting our approach, and the result of that approach on our students, is key to moving forwards.   The Simultaneous Learning approach maps very well onto Unconditional Teaching - the teacher very much bases the next thing in the lesson on how the student dealt with the last thing. And this leads us to my final point, and the subject of the final chapter in the book: looking inwards.


For the most effective teaching, we need to be deeply self-aware – in particular, of the impact we have on our students. We need to be aware of how what we say and do affects each and every student.  And it will affect each of them, and to some degree, differently. This requires us to adapt – continually. Which is a key quality of moving towards more unconditional teaching.


Having said that, teaching unconditionally is not an outcome or a destination we can finally reach. In fact, none of us can become wholly unconditional in our teaching. It’s simply not possible. 


But it is a state towards which we should constantly be striving. It’s a kinder, more accepting, more inclusive kind of teaching that may ultimately, in some small way, help make the world a slightly better place.


To learn more, purchase a copy of Paul Harris’s Unconditional Teaching. Out now from Faber Music, available to buy from all good retailers and online.


https://www.fabermusic.com/shop/unconditional-teaching-p439044

Some Baffling Baermann

A clarinet teacher was recently in touch with a rather interesting query over a marking and a flat in my edition of the Carl Baermann Variations Sentimentales (No. 74 in More Graded Studies for Clarinet Book 2 published by Faber Music) and presently set on ABRSM’s Grade 8 syllabus.

This particular study comes from Baermann’s Clarinet School Op 63, first published in 1864 taking the clarinet player from what was considered a beginner in those days (the very first exercise uses virtually the entire range of the instrument!) via a systematic journey through all the keys (with related scales, exercises, and studies).

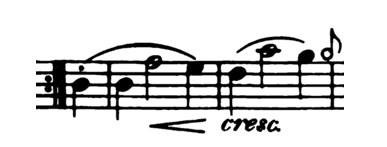
I was fairly certain that I hadn’t made any errors in my Faber edition but nevertheless decided to undertake some detective work. The first query concerned a staccato marking under a slur (found in the first upbeat of bars 4, 8 and 12).

In both my edition and the 1918 edition of the Baermann Complete Method published by Carl Fischer, the note appears as follows:

Baermann Complete Method, 1918

In performances this suggests a slight separation of the two B-flats.

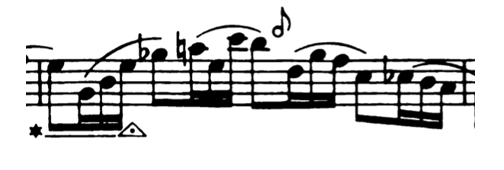
I decided to investigate the original 1864 edition published by Offenbach am Main. Baermann, in fact, places a dot over both the B-flats:

Clarinett – (Schule, 1864)

So, the question is, was it a deliberate edit by Gustav Langenus in 1918 to miss out the second dot or an error in the typesetting?  

I have followed Langenus in my edition because, in my opinion, as presumably in Lengenus’, a separation between the first and second beat (of the full bar after the upbeat) is not appropriate for either the phrasing or character of this music. Also, the following variations don’t indicate a separation of the first and second beats, and to separate these beats would interrupt the flow of the music. The other query concerns a G-flat in bars 44 and 59 in the second variation.

Baermann Complete Method, 1918 - Variation 2, bar 44

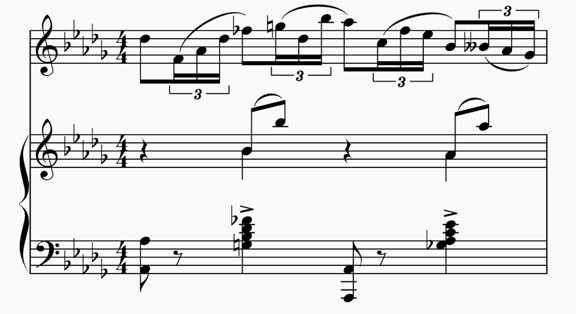
Neither Langenus in his 1918 edition, nor Baermann in 1864 indicate that this G-flat should be naturalised in its second appearance in both those bars. The original edition was published with a piano accompaniment but sadly these are rarely used today, with the whole set of studies usually played unaccompanied. In investigating the harmony in the piano accompaniment, the G-flat is clearly intended throughout the bar; there is no inference for a change back to G-natural.

Bar 44 with piano accompaniment (showing clarinet part in concert pitch)

In fact, the G-flat, when it returns in the third beat is an entirely acceptable passing note, however as an unaccompanied piece, you may prefer the sound of a G-natural on its second appearance. Thus, maintaining the G-flat or altering it to a G-natural both work in performance. It’s entirely up to you!

Assuming that most music is correct when you see it in print (from first editions onwards) it’s probably best to follow the printed score. There are of course exceptions to this ‘rule.’  Performance markings (marks of attack, articulation and dynamics) were fairly sparsely used until the late Classical and early Romantic periods. Weber was well known for leaving many of these choices to his performers. For example much of what you might see in today’s editions are often editorial. So, using good taste and making informed choices is quite acceptable, particularly when it comes to the interpretation of those markings in music of this period. Making changes to pitch is more questionable, though it’s impossible to know whether, just occasionally, a composer might have made a mistake, forgotten to correct an accidental… or maybe simply ran out of ink at the crucial moment…

Linking it altogether – making practice purposeful

This journey into the virtual world of teaching we are all now experiencing will have brought about many changes to the way we work. Among them will be the way we are encouraging our pupils to think about their practice. I hope you are enjoying the related concepts of Mini Outcomes and Personal Bests and maybe getting your pupils to try Slow Motion practice: the three main activity-based concepts we’ve been considering in this series of blogs. 

In this last blog on practice I’d like to look at how we might introduce various ideas for practice during the course of the lesson and how these might be represented ‘on paper’ to remind and inspire pupils.

My two favourite (connected) questions in lessons are, “When you practise, how might you do that?” and “What will you do next?” I always like to give the impression that I’m assuming pupils will practise (“When you practise...”), so I rarely tell them directly to practise! ‘What will you do next?’ is a direct link with Simultaneous Learning – which is all about devising a lesson in which one activity naturally leads on to the next through natural connections with all the various elements that make up music. Every lesson should be a voyage of discovery around the Simultaneous Learning Map of the Musical World (which can be downloaded here). Each activity can take a pupil (and the lesson) to another, connected place in our musical world…

SL+Map+NEW2.jpg

A successful Simultaneous Learning lesson will make many connections, access the imagination (teacher’s and pupil’s), proactively set up a number of understandable activities - and it’s surprising how many we can make in a lesson. And as we’re teaching we can be asking “How will you do that when you practise? … And what connection will you make next?”

The Simultaneous Learning Practice Map (see below) can help pupils with this. As the lesson proceeds, simply get pupils to fill a word or two in the relevant bubble to nudge their thinking when they practise. It really can make quite a big difference (and save us a lot of time) in these days of lessons on Skype or Zoom. We want pupils to remember the lesson: what we did, the order in which we did things, how we solved problems and how we moved from one activity to the next. We want to try to encourage pupils to connect with this kind of thinking in a practice session – in a sense to have a continual conversation with themselves.

  • What shall I do?

  • How shall I do it?  

  • Can I find a Mini Outcome or do a Personal Best here? Maybe some Slow Motion work?

  • That didn’t quite work, I wonder why?  What can I do differently that might help?

  • What shall I do next?

Having this Map will help and encourage this type of thinking. The “what shall I do next?” question is not to be interpreted as “what piece/song shall I play/sing next?” but rather “what connection shall I make next?” or “where shall I go on the map next?” And as pupils travel around the Map they can draw a line to join the bubbles – they are seeing and thinking about exactly how these areas do connect. By drawing the line, they are representing, on paper, the connection that is simultaneously being made in their mind. 

As the week between lessons unfolds, pupils can be encouraged to keep their Practice Maps nearby and maybe revisit the activities in a different order. It’s amazing what we might see when we do things in a different order. Suggest they might think about doing the same thing but in a different way or maybe even introduce an area, an activity (a bubble) that wasn’t included in the lesson.

We are helping pupils to develop a real sense of purpose and direction in their practise. Purpose is SO important – it’s one of the key motivators of life.  Once there is purpose, there is energy, which fuels engagement and the satisfaction of working hard. There is nothing negative (or difficult) about hard work, by the way!  Once pupils are in that zone who knows what their practice might yield. If we can motivate our pupils to practise because they want to then we are really winning. Everyone benefits.

Some resources

The Complete Practice Workbook contains Practice Maps alongside structured questions and activities to stimulate pupils’ imaginations and help them to engage, thoughtfully and happily, with their practice. It supports Simultaneous Learning and good practice generally in the new online lesson environment.

practice-workbook.png

The Musicians’ Union Practice Diary, for younger learners, is fun and engaging, with diary pages that encourage focus and imagination, Practice Connection boxes to initiate thoughts about making connections & for motivation there are Practice Starter pages and fun projects.

practice-diary.png
practice-cards.png

The Simultaneous Learning Practice Starter cards are closely linked to the bubbles and based on Simultaneous Learning approach, giving fun & imaginative starting points for practice.

If you would like to understand more about the key role of the teacher in improving practice and how this can be intrinsically linked to Simultaneous Learning, The Practice Process delves deeper into a psychological and holistic approach to practice, with the central aim of encouraging pupils to enjoy it.

practice-process.png

Can slow practice ever be exciting?

Now there’s a question to ponder…

Most pupils equate slow with boring. But if we can help those pupils to enjoy a bit more active engagement with their practice, we can begin to change this age-old attitude.

For many, practice is done with the brain remaining in a fairly low gear, with brain power only just in the on-position, playing through pieces or singing songs, possibly correcting the odd mistake along the journey. 

Energy levels tending to stay quietly and pleasantly subdued. For others, maybe practice is more active – making connections, and being more imaginative and creative.

For those who might be having a go at introducing more Mini Outcomes and Personal Bests into their practice, they might be finding that it can actually generate a lot of fun and cause a real rise in those energy levels.

So what about slow practice?

Once we’ve programmed a computer to do something, it will always do it. As we practise, we need to programme our brains in a similar way. If we do this programming carefully, the consequent progress will be significantly enhanced.  Here’s a thought:

Slow Practice – Fast Brain

As we are carry out our next activity let’s put our brain into high gear. Maybe the decision is to play a four-bar phrase (we often simply set off to play too many bars).  Choose a slow pulse – it’s not slow really, it just means that it will take longer to get to the next pulse or beat – the next event.  But in the time we’ve given ourselves in the journey to that next beat we can think! We can do a lot of fast and really focussed thinking on what we are about to do to get to that next beat successfully.

So what might we be thinking about, and what might we be working out (fast!) in that extra moment we now have?

  • Which finger is going to play the next note?  Is my hand shape correct to play it?

  • Exactly how will I make the change of hand position for the next note?

  • Are the correct fingers ready and energised to play the next chord?

  • Which part of the bow should I be in?

  • Exactly what am I going to do to the bow speed? 

  • What will I do to make a change of dynamic?

  • How will I control the staccato/legato/accent?

  • Can I hear the pitch of the next note really accurately before I sing it?

There are literally endless aspects of playing or singing we can prepare as we get ready to move to the next beat. By making that preparation, whatever it is we have to do on that next beat – we will certainly do it better!

Maybe we then  repeat those four bars.  But let’s not repeat them mindlessly.  In the extra moment we now have we can polish our previous thought and action or we can consider a different thought in perfecting the journey to the next beat.  We can repeat the phrase many times, each time with a different thought in our active minds.

We are carefully and effectively programming our brain. And once programmed, we will find that, like any computer, our brain will begin to do the job on its own and do it accurately and with understanding.  Then we can begin to shorten the time it takes to get to the next beat (‘play faster’).  Our brains have got it. Putting the next thing sooner (‘playing faster) is no problem for our well-programmed brain.  And, because of this thorough preparation, we are then able to apply it to other similar situations.  Our learning is advancing in every possible way.

Similarly, when we are preparing our Mini Outcomes the outcomes will be even more effective with occasional slow practice.  And that will ultimately cause even more success in our Personal Bests.

We are actively engaging our minds.  And when minds are actively engaged they don’t get bored! Slow practice is far from boring – it’s quite the opposite. Slow practice is exciting!

Developing a new approach to music practice

In the previous post we talked about encouraging pupils to have maybe two shorter practice sessions in a day rather than one longer one.

As part of our challenge to begin changing our pupils’ practice mindsets, let’s begin to challenge them with some questions they need to ask themselves as they set out on their short practice sessions:

  • Why am I going to do this?

  • How am I going to do it?

Then they devise an activity that fits either the Personal Best (PB) or the Mini Outcome (MO) models. They do the activity.

  • I did it…

  • What shall I do next?

  • What have I achieved?

Paul Harris april 2020.png

Let’s take one of the potentially less glamorous areas for practice – a scale – and see what might be possible…

Practice No 1

Minuet in G is my new piece. So, as it is in G,  I’m going to begin by practising the scale of G. (Other ingredients are staccato and p.)

1st activity I’ll play one octave of G up and down quite slowly, with even rhythm (noting the speed on metronome). (MO)

2nd activity:  I’ll play it staccato. (MO)

3rd activity:  I’ll play 2 bars of really well controlled staccato notes in a row. (PB)

4th activity I’ll find two bars (that are made up of a staccato scale passage) and play them with even rhythm and really crisp staccato. (MO)

Reflection What have I achieved? I’m aware I’ve made some progress.

Practice No 2

1st activity I’ll play that scale again one notch faster (or maybe 2!). (PB)

2nd activityI’ll clap the rhythm of the whole piece very steadily*. (MO)

3rd activity:  I’ll work on that 2-bar phrase again to get it really well controlled and with a dance-like character. (MO)

4th activityI’ll play it again as softly as I can. (PB)

Reflection:  I’m aware of my progress (pupil begins a chart for scale tempo) and looking forward to my next practice!

*Wasn’t sure of the rhythm in bar 6, so will ask teacher.

So, in one day’s practice they’ve achieved five Mini Outcomes and three Personal Bests and have one question for the teacher. Of course, the sessions won’t actually go exactly like that, and pupils will need a bit of help and encouragement. In lessons, talk equally about the practice activities alongside your more usual lesson feedback.  Use questions like:

  • How might you practise that?

  • What activity might you do next?  

And always ask for a report on the Mini Outcomes (MOs) and Personal Bests (PBs), suggesting one or two new ones from time to time (see last post!).

All being well, an exciting new kind of approach is brewing. An activity-based approach, driven by short, clear, fun, understandable, mildly challenging and imaginative activities. In time it will grow and a whole a new attitude towards practice will have developed.